Friday, December 16, 2011
Thursday, December 15, 2011
Non-Traditional Christmas Card In Blue & Grey

Some of my favorite subjects, butterflies. This is almost a traditional color anymore, but not quite.
Challenges:
Thursday, December 1, 2011
Pop-up Device Tutorial

Materials:
- 1/2 inch x 2 1/2 inch scrap of acetate from packageing
- Scor-tape 1/4 inch wide for this
- Scor Buddy or Pal
- Score the acetate at 1/2 inch increments. Exercise the folds back and forth once or twice to loosen them, but if you do it too much they might break entirely.
- Place tape on one of the flaps at the end of the strip.
- Make a square by folding the acetate on the score lines, overlapping the taped flap to the other end of the strip. Make sure that you flatten this out when you stick them together, as this will assure that the card will close with a minimum of bulk, and the pop-up with stand properly when you open the card.
- Put tape on two consecutive sides of the squares. This is where you will attach the device to the front and back of the inside of the card.
- Place a strip of tape on the front square of the cube on the top edge only. Be sure that you don't get tape on the top square of the cube, as this will not allow the po-up to stand when the card is open.
- Place the pop-up art on the glued front square. Close the card and see how it works.
Monday, November 28, 2011
Embossed Fairy

I used Inkadinkadoo Fairy Stamp on a direct to paper background make with Adirondak Inks. I use Art Glitter Black with irridenscent bits, which actually show up in this photo. I used the embossing powder around the edges to create a matte.
Crafty Card Makers #57 Heat Embossing
Scrapbook Sisters: Card 62 Challenge, anything goes
Friday, November 25, 2011
I'm Grateful and Thankful
This card will be a challenge card. See listings below, which are made as I enter the chanllenge.

The papers are Creative Memories, the flowers are things I have had in my stash for 10 years at least, and the packaging is gone. I use Spellbinders dies to cut the shapes and bling is BoBunny.
 The inspiration room.
I used the patterned paper because is resembled the pattern in the table cloth. I chose the gold for the gold flatware, the blue in the goblets and candles, and the crystal bling for the chandelier. The orange and white flowers are for the floral arrangement.
Belli Challenge #131 - Thanksgiving
TPE126 ThanksGiving
Being Thankful at PaperPlay Challenges
'11 Week 47-Being Thankful

The papers are Creative Memories, the flowers are things I have had in my stash for 10 years at least, and the packaging is gone. I use Spellbinders dies to cut the shapes and bling is BoBunny.

I used the patterned paper because is resembled the pattern in the table cloth. I chose the gold for the gold flatware, the blue in the goblets and candles, and the crystal bling for the chandelier. The orange and white flowers are for the floral arrangement.
Belli Challenge #131 - Thanksgiving
TPE126 ThanksGiving
Being Thankful at PaperPlay Challenges
'11 Week 47-Being Thankful
It's Black & White
I made a winter wonderland. This Thomas Kinkade stamp is an all time favorite, and I understand that another company has bought the stock of the Cornish Heritage Farms so hopefully I can get all the rest of them. These stamp look stunning done just in black ink on white paper. I really enjoyed planning and making this card.


I like to write a little about how I made this. I used Ranger Archival Ink and LaBlanche Speciality Paper to stamp the Thomas Kinkade Stamp. The Ink and Paper make this highly detailed stamp into a perfect image. You can see ALL the detail without any bleeding of the ink.
I cut the sentiments with my Cricut Imagine using the Winter Frolic cartridge. I used a Sakura Stardust Clear pen to make the black stand out like that. Wow, it even shows up great in this picture. I was rather surprised by that.
I made the flowers with the Tim Holtz (TH) Sizzix Die-Tattered Florals, and Tags & Tabs is also TH and the snowflakes are from a Sizzlet Die. I embossed the black cardstock with the music embossing folder from Sizzix.
Challenges Entered
Crazy 4 Challenges C4C115
Thursday, November 24, 2011
Butterfly the Beauty

The recipe is:
- Ribbon-I used Mizuhiki paper cord ribbon, but you can't see it very well as it is behind the flower and is cropped by the program.
- Layers-I used a decorative paper on a white card that was distressed with Vintage Photo by Ranger, then a top note die cut.
- Image-I used the Hampton Arts Stamp that goes with the Graphic 45 Once Upon a Springtime, and used Copic Markers to color the Fairy.
- Brad to hold the ribbon and flower together.
- Patterned paper from Graphic 45 Steampunk Debutant
I love the Graphic 45 papers, and the grunge and steampunk art. Vintage and shabby chic also have a place in my designs.
Tuesday, November 22, 2011
Acetate & Chalk
This card is stamped on acetate I salvaged from embelly package, using stazon black. Let it dry completely. Run the backside, not the stamped side through the xyron machine to get glue on the backside. I painted it with Pebbles Pearlesent Chalk and a No. 2 Filbert White Taklon brush on the side with the glue. It's hard to see on the web, but this has a really nice sparkle to them. You needn't worry over much about staying in the lines, as they will show through regardless. I mounted the acetate on a white piece of paper. The thing will still stick to paper after the chalk. I cut it into perfect quarter square, and glued the squares equal distance apart. I placed this on the inside of a card into which I had cut a square. Make sure to line up the center of the picture with the center hole in the card. I used a white piece of paper to create a frame for the inside piece.
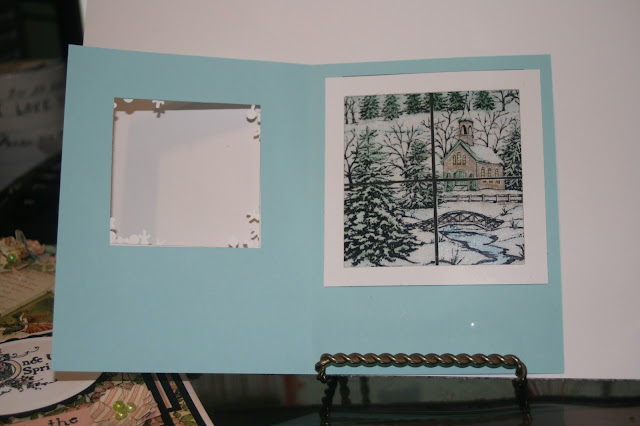
 The front I decorated with a BoBunny decorative paper, and created a white frame for the hole. I like to think of these as windows, but this one doesn't quite looke like a window. I cut the snowflakes with a sizzix die.

 The front I decorated with a BoBunny decorative paper, and created a white frame for the hole. I like to think of these as windows, but this one doesn't quite looke like a window. I cut the snowflakes with a sizzix die.
Greetings and Scene by Northwood Stamps.
Monday, November 21, 2011
Was Gonna Wait, but here they are.

I made these cards for a card class I did at The Scrapper's Place in Findlay, Ohio. These are just the nicest stamps, and the LaBlanche Stamps and Paper are supurb for stamping their silicon stamps. I'm sad that the photos aren't any better than this, but they are gorgeous. I'm going to try to get some better photos tomorrow.

Made this guy for a friend who is, can ya guess? An Ohio State fan. He is a CC Design, and painted with Copics. I like the way her turned out. At the same time I did a little girl by CC Designs, and I called her Apple Gal as he is surrounded by apples.
Let's Make a Tattered Rose
| November 21, 2011 | Tutorial for the Tattered Floral paper Rose |
| Supplies: · Tim Holtz Alterations Die Tattered Florals · Cardstock of about 80# weight · Scissors · Quick Dry Glue such as Scotch · Large Glue Dots |  |
Instructions:
| 1. Cut 3 six petal flowers from with the next to the smallest flower. |  |
| 2. Fold the flower petals into quarters. |  |
| 3. Cut the point at the center of the flower in a curve to form a circular hole in the middle of the petals. Do this to all three of the petals. |  |
| 4. Cut one of the petals to remove 1/2 of a petal, and throw the cut out away. Cut the second on to remove 1 1/2 petals, and keep both pieces. Cut the third petal to remove 2 1/2 petals, and keep both pieces. |  |
| 5. Starting with the 5 1/2 petal piece, run a small line of glue along the front of the 1/2 petal, and attach it to the backside of the petal to form a 5 petal flower piece. Do this same thing to all the rest of the pieces except the one petal. The single petal piece you just roll into a tube with one end small than the other, and this forms the center of the rose. |   |
| 6. Leave the glue dot on one of the pieces of paper that it came adhered to. Press the 5 petal piece into the glue dot, the press the 4 petal into the glue dot in the center hole, then 3, 2,1. Now you have a rose that you can stick anywhere that the glue dot will hold it. You can roll the petals over a skewer, distress the edges before assembling, highlight them with pait. All kinds of nice stuff can happen with these. |     |
©The Copyright to this tutorial is held by Lynne Neumann. This material may not be reproduced in full or in part without the express written permission of the author. You may feel free to link to this tutorial. questions@wtppro.com
Saturday, November 19, 2011
Yikes it's a Box

These boxes make great gifts for teacher with this paper. Other papers will make great gifts for friends and family.
· Graphic 45 Paper of Choice
· Strong Dry Adhesive Runner
· Small Glue Dots
· Adirondack Acrylic Paint Daubers in Gold and Black
· Maya Road-Embellishments, ruler, bingo like chips, library like pockets, wooden buttons & journal blocks
· Crochet Ribbon
· Black Patterned Ribbon
· Sentiment Stamps
· Buttons
· Black Floss
· Green Leaves
· Knob for Cover Pull
· Crystal Lacquer, Diamond Glaze
· Tissue Tape
Tools
· Paper Trimmer
· Dry Adhesive
· Journal Pen/Marker
· N0. 8 Bright Taklon Paint Brush-Cheap is good.
· No. 8 Bright Bristle Brush, Cheap is the only way here.
· Fussy Cutting Scissors
Instructions

2. Paint all surfaces of the box black using the black paint dauber. Use a white taklon brush to get into the corners. Leave box dry before performing other painting steps. There is no need to waste paint for under the areas that will be covered by the G 45 art work. CLEAN BRUSH IMMEDIATELY.
3. Chose your artwork for the inside box, and cut the pictures in a way that is appealing, and a proper fit for the space. Cut instructions as follows:
a. 2 box panels of an all over patterned paper cut @ 4 3/4" x 1 3/8"
b. 2 box panels of an all over patterned paper cut @ 4 7/8" x 1 7/8"
c. Inside Top that shows through the cut out has a max size of 4 1/2" square, and can be as small as 3" square and still fit the space where the whole is, as long as it is aligned properly.
d. On the back side of the inside top you can attach another graphic from the G45 Cardstock which should measure no more than 4 1/2 inch square and should be centered to prevent the graphic from holding the book opened or placing tension on the cover that won't allow the magnet to hold it closed. (a lesson learned the hard way.
e. Cover the bottom of the inside with a graphic cut to 4 3/4" square.
f. Adhere the all over graphics to the outside small panels. Do not use them on the inside two panels, as they will prevent the magnet from holding the box closed.
Mini-Album Assembly

1. Cut the accordion folded album into 4 pieces on the folds.
2. Dry brush the edges of the pages with black dauber paint, and also some gold.
3. Dry brush the edges of the library like envelopes and journal cards.
4. Decorate the pages of the album with flowers, bingo chips, library envelops, tissue tape. Remember, we will be punching holes in the corners for the ring to hold the mini together.
5. Cut a graphic out of a piece of paper to adorn the cover. I used decorative corners from some of the papers where I had cut an image from the inside, and used to decorate the front corners of the mini-album.
6. Make 4 roses from the Tim Holtz Die cut. I also used several of the single petals to make flowers for inside the album. I used the wooden buttons and bingo chip pieces for flower centers.
Tuesday, August 30, 2011
Back Again

Experimenting with HTML
Just learned to bold the title. I like that.
The Card
This is a Graphic 45 card again. I used a stamp set from Hampton Arts of Graphic 45 Once Upon a Springtime images and stamped with Mementos Tuxedo Black(one of the best inks for use with Copic Markers)for the Title. I used Copic Markers to Color the title, and Spellbinders oval to cut it out and stencil Tattered Rose Distress Ink from Tim Holtz and Ranger. I used G45 patterned papers layered on black mattes. I used the Tattered Rose Ink to color a white scrap for the stamped sentiment from Great Impressions. I used the samll flower from Tim Holtz's Tattered Floral, and used my McGill Stylus set to cup them. I stacked 3, and used my Copic Marker to color some white pearls to match the layout.
Cut Sizes in Inches
I used a whit card base made out of 5 1/2 by 8 1/2 GinaK Heavy Base Weight, folded in half to form a 4 1/4 x 5 1/2 card.
5 1/4 x 4 Black
5 x 3 3/4 flower print layer on above
2 3/4 x 4 3/4 Black
2 1/2 by 4 1/2 Stripe layer on above
2 1/4 x 4 1/4 Black
2 x 4 flower print layer on above
Assemble according to card picture.
Copics Used
YG03
YR00
RV10
E04
YG11
Sunday, August 28, 2011
Lost in the Process

I just love all of Graphic 45's products, and use them as often as I can. I almost hate to cut some of the papers as they are so beautiful. I will go way out of my way to preserve the artwork when using them for scrapbooking. Right now all of my samples are displayed at "The Scrapper's Place" in Findlay, Ohio, but will post them here when the classes are complete.
This card is easy. All measurements are in inches. I used a punch out from the Graphic 45 Once Upon a Springtime collection, a 4 x 5 1/4 Flight piece centered on a 8 1/2 x 5 1/2 black card folded to make a 4 1/4 by 5 1/2 card base. Matted a 2 1/2 x 4 3/4 Primrose on a black cardstock with 1/4 border. Stamped a sentiment on white, cut it out with a Spellbinders, Nestability round die, and stenciled it with Tattered Rose Distress Ink from Ranger. I matted the circle on a Spellbinders, Nestability Scalloped Circle in black. I used the Tim Holtz Tattered Florals Die to make a Cabbage Rose, and I will not give the instructions here as You Tube has a million tutorials on this die and rose. I used a glue dot to hold the rose in place. I line these cards with light parchment and stamp and decorate it as appropriate to the occasion. This card will not go through the mail easily, unless you use a box to hold it. I use these for gifts and occassions where I got in person to deliver the cards. It's more fun to watch them open the box and get it.
Friday, August 26, 2011
August 26, 2011

This one is fast and easy, the most fiddely thing about it is the flowers. I used the smallest flower from the Tim Holtz Tattered Floral die. Using scraps from the G45, I cut 3 for each cluster. I prepared the flowers by using the McGill Flower Stylus Set, the larges ball and using a circular motion in the very center of the flower I made a cup. There is a demonstration on www.paperwishes.com on making flowers with the McGill Punches and Stylus. I held the cupped flowers together with one hand in sort of a triangle and pressed all three into one large glue dot assuring that all the flowers were stuck in the dot. I cut leaves out of scraps of paper with green print, placed the in the corners with their ends touching, and pressed the flowers on the glue dot right on top of the leaves securing them all to the card. I used a white confetti 5 1/2 by 8 1/2 strip of cards stock to make a 4 1/4 by 5 1/2 card. Edged the card with Tattered Rose Distress Ink. Used a 1 3/4 by 5 Primrose scrap and a 5 1/4 by 2 black matte. I used a post card, and art picture from the same piece of 8x8 Once Upon a Springtime collection. I used two stamps from the same collection and used the Tim Holtz Tiny Attacher Stapler to staple a 3 frame piece of the Tim Holtz Film Strip to the stamp. Use the card for placement of the elements.
Wednesday, August 24, 2011
Longtime No See

Have been neglecting this page for too long. Decided to share some cards that I made recently. I have had a blast with these.
This is a Great Impressions stamp called Hydrangea, I stamped it with Versamark and embossed with black. I used Copic Markers to add colors, and stickles, which actually cause some cool color changes in the markers. Used gold embossing on the edges by dragging the card edge directly through the Versamark. I stamped and colored extra hydrangeas, and used foam dots to place them over the matching flowers on the main card.

This is another Great Impressions Stamp. I used Copics for color, and Sakura Stardust and jelly rolls for shimmer effects. I used Flower soft on some of the flowers and the centers of the sunflowers. I stamped and colored extra butterflies, cut them out and applied glue just to the bodies of the butterfly and placed them directly over the butterflies on the card.

Yes another Great Impression Stamp, done with copics and flowersoft. I cut this into three one inch panels and matted it with a 1/8 inch border. It was a direct take off of one that was part of the Great Impressions demo board at The Scrapper's Place in Findlay, OH.
I have been experimenting with the Copics and have to say I just love them. The colors and techniques that you can acheive with them are superior to other markers.

I bet you will never guess what company did this stamp, and what I colored it with. LOL Great Impression and Copics.
Subscribe to:
Posts (Atom)