Using the New Copic Marker
Colors Tutorial
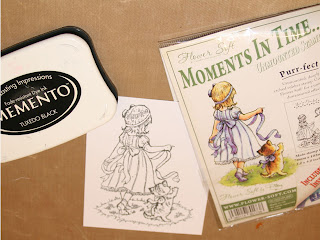
Stamps
·
Magnolia’s-Tilda w/ Lovely Lace Shoes
·
Stickables-Je t’aime
Spellbinders
·
Ribbon Tags Trio
Tim Holtz Alterations
·
Embossing Diffuser
Cuttlebug
·
Swiss Dot Embossing Folder
Embellishments
·
Petaloo-Color me Crazy flower of choice
·
Maya Road Crystal Trinket Pins
·
Pebbles Crystal Candy Dots
·
Studio Calico Wood Veneer Butterfly Assortment
Memento Ink
·
Tuxedo Black
Miscellaneous
·
White Ink Ballpoint-I used Inkssentials
·
Pink Spritz-I don’t remember what I used
·
Pink Organza Ribbon of choice
See Instruction details for the Copic Colors used in this
tutorial.
Instructions:
Stamp Tilda on a good quality alcohol marker paper such as Cryogen. You must use a dye based in with alcohol
markers of all kinds. StazOn will be
removed by the alcohol, and smeared all over the image.
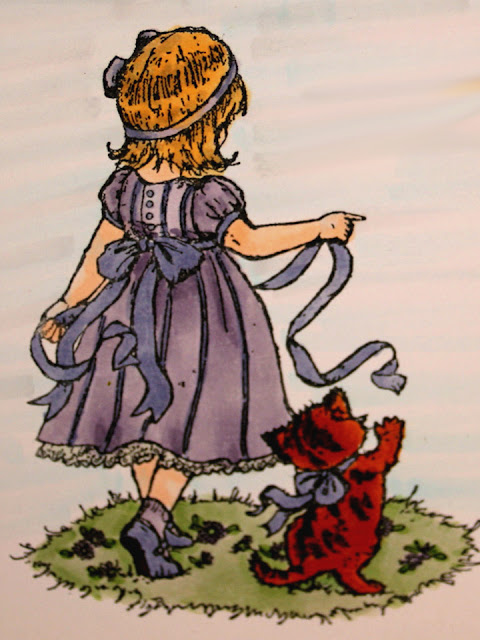
I generally begin coloring the face.
I place a layer of the lightest skin color down all over the face. This image begins with E000 Pale Fruit Pink.
This would be the 1st layer for all skin.
The
next color is E11 Barely Beige. This will be the layer where you put the
shadow down. In this instance the light
is coming from your left; therefore, the shadows are deeper on the right side. See picture 1
The
next color is E00 Skin White, and this is flicked
in from the center to the darker color.
Don’t worry about blending this at this time. The reason for making this round is to give
the face a rounded shape.
Now that you have all the layers in place you will take the E000 Pale Fruit Pink, and flick that into the E00 Skin White, being careful not to get it into
the E11 Barely Beige as that would lighten
the shadows too much. Blend that so it
has a smooth transition from one color to the next. The go to the E00
Skin White, and blend that well with the E11
Barely Beige, into both areas.
Make sure that you don’t totally obliterate the transitions. You can go between the three colors until you
are satisfied. Just remember that each
time you add color will cause the color to darken a little. Also remember that the colors will look
harsher than they will once they dry.

Next we will do the blush on her cheeks
using R20 Blush. All Tilda images have the three dots on the
cheeks. This has kind of become the
default “Rosey” area of the cheeks. Just
use the R20 Blush to make a circle that just
goes a little way outside the dots. You
can use the E000 Pale Fruit Pink to tone the edges down, but be sure
not to obliterate the transition.
NOTE: These examples are the wet colors, and the
edges look harsher than they will when the dry.
I did this so there was no question about where the colors are
originally placed.
Using
the YR27 Tuscan Orange, Place color in the part and the natural
low areas that would have shadows.
With the Y23 Yellowish Beige and the YR27 Tuscan
Orange tap the Y23 Yellowish Beige onto the YR27 Tuscan Orange pick
up some of the darker color and blend it into the darker area. Remember you want to make sure that you have
that darker color on the lighter in the lighter areas. This is called “Color Pick-up” and it is a
technique that will allow you to easily blend colors that may be a little too
far away from each other for normal blending.
In this demonstration I wasn’t to careful about staying in the lines as
this will be cut out.
I just work with color pick-up and the
lighter shades untill I am satisfied with the transitions. It really worked well with these two colors.
 I used the BG90 Gray Sky to color the soles of her
shoes, nothing fancy here. Just color it
in.
I used the BG90 Gray Sky to color the soles of her
shoes, nothing fancy here. Just color it
in.
I used R56 Current &
R20 Blush to do the shirt. I used
the darker color on the shaded areas, and used the color pick-up method and
blended the colors together. These two
colors worked rather well, but did give it a more stonewashed effect. Which did make me unhappy in the least.
We are going to use a different technique here that
takes advantage of the fact that each layer of a color makes the color
darker. You will lay down the BG90 Gray Sky on
the pants, the proceed to color the shoes with G43 Pistachio. You will go back over the pants then
in the areas that would have natural shadows.
You will deepen them several times in the deeply shaded areas. You will do the same with the shoes,
alternating between the colors to let the other color have time to dry. This is more time consuming, but makes a
wonderful effect.
The leaves were colored with
the copic markers. One of the
great things about the copics is that they can
be refilled and the cost is minimal. It
makes it really easy to color coordinate you embellishments with
you favorite images. Just ask Lisa about
this at Scrapper’s Place in Findlay, Ohio, or your local Copic Dealer.
The butterflies were also colored with the
copics.
Finish the card as shown above.
I used the Swiss dot Embossing Folder with the oval Diffuser, and place the fussy cut Tilda in the plain area on foam dots.
I always like to take a dark color marker and go around the cut stark white edges and color them. It gives the piece are really nice finished look. I also use the white gel pen near her freckles, but to completely cover the black ink.
I also put highlights in her eyes just off center at the top of the eye. These are typical Tilda finishes, and they look nice also.
I hope you enjoy.
Lynne Neumann for Scrapper’s Place in Findlay, Ohio
 This is the finished card front.